

똑같은 삽질은 2번 하지 말자
Vue.js 끝내기 No.13(Filter, 라우터 네비게이션) 본문
Filter
기본 필터 적용방법
컴포넌트 속성에
filters: {
    formatDate(value) {
      return new Date(value);
    },
  },
필터스 속성 추가한뒤(Date는 자바스크립트에서 기본 제공해주는 객체이다.)
{{ postItem.createdAt | formatDate }}이렇게 사용해 주면 된다.
커스텀한 필터를 전역으로 설정해주고 싶을땐?
custom filter 함수
utils/filter.js
export function formatDate(value) {
  const date = new Date(value);
  const year = date.getFullYear();
  let month = date.getMonth() + 1;
  month = month > 9 ? month : `0${month}`;
  const day = date.getDate();
  let hours = date.getHours();
  hours = hours > 9 ? hours : `0${hours}`;
  const minutes = date.getMinutes();
  return `${year}-${month}-${day} ${hours}:${minutes}`;
}
그리고 main.js
import Vue from 'vue';
import App from './App.vue';
import router from '@/routes/index';
import store from '@/store/index.js';
import { formatDate } from '@/utils/filters.js';

Vue.filter('formatDate', formatDate); // 필터는 이렇게 넣어준다.
Vue.config.productionTip = false;

new Vue({
  render: h => h(App),
  router,
  store,
}).$mount('#app');
그런 다음 아까 추가한 컴포넌트의 filters 속성을 주석처리하면 우리가 커스텀한 filter가 적용되는 걸 볼 수 있다.
라우터 네비게이션
라우터 네비게이션으로 권한이 필요한 페이지의 접근을 로그인없이는 안되게 하고 싶다.
그전에 데이터 호출 시점을 알아보자.
1.컴포넌트 라이프 사이클 훅(hook)
-created: 컴포넌트가 생성되자마자 호출되는 훅
created에서 데이터를 받아오는 방식은 일단 페이지 이동이 일어나고 나서 데이터를 받아온다.
그래서 페이지 이동이 됬음에도 그전 페이지의 데이터가 살짝 보인다.
2.라우터 네비게이션 가드
특정 URL로 접근하기 전의 동작을 정의하는 속성(함수)
페이지 전환전 데이터를 받아오는 것이라서 spinner 같은 제대로 앱이 작동하고 있는걸 보여줄 수 있다.
그러므로 라우터 네비게이션을 사용하면 페이지 전환전 로그인이 되어있는지 체크를 할 수 있다.
https://router.vuejs.org/guide/advanced/navigation-guards.html#global-before-guards
Navigation Guards | Vue Router
Navigation Guards As the name suggests, the navigation guards provided by vue-router are primarily used to guard navigations either by redirecting it or canceling it. There are a number of ways to hook into the route navigation process: globally, per-route
router.vuejs.org
router.beforeEach((to, from, next) => {
  // to(가는곳) from(지금) next(가라)
  console.log('to의 구조 ' + to);
  if (to.meta.auth) {
    console.log('인증이 필요합니다.');
  }
});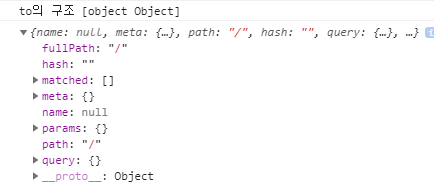
to에 있는 meta에는 데이터를 담을 수 있으므로 to를 이용해
routers/index.js
{
      path: '/main',
      component: () => import('@/views/MainPage.vue'),
      meta: { auth: true }, // 이 페이지에 접근은 권한이 필요하다.
    },
    {
      path: '/add',
      component: () => import('@/views/PostAddPage.vue'),
      meta: { auth: true },
    },
    {
      path: '/post/:id',
      component: () => import('@/views/PostEditPage.vue'),
      meta: { auth: true },
    },
 }
router.beforeEach((to, from, next) => {
// to(가는곳) from(지금) next(가라)
if (to.meta.auth && !store.getters.isLogin) {
console.log('인증이 필요합니다.');
next('/login');
return; // 여기서 return 을 안하면 다음의 next가 실행되버린다.
}
next();
});인증이 필요한 페이지에 로그인이 안되어있으면 login창으로 이동하게 한다.
'Vue' 카테고리의 다른 글
| Vuex 소개, Flux패턴, Vuex가 필요한 이유,Vuex의 구조 (0) | 2020.06.26 |
|---|---|
| Vue.js 끝내기 No.14(테스트,Jest) (0) | 2020.05.30 |
| Vue.js 끝내기 No.12(API 함수 모듈화,Delete,) (0) | 2020.05.24 |
| Vue.js 끝내기 No.11(Cookies, 중간리뷰) (0) | 2020.05.23 |
| Vue.js 끝내기 No.10(Vue Life Cycle, Vuex의 구조) (0) | 2020.05.23 |

